Why Uluru Is a Dream Destination for Travel Photographers
Nestled in the heart of Australia, Uluru stands as a monumental symbol of natural wonder and cultural heritage, making it a captivating subject for travel photographers worldwide. Its towering presence and vibrant hues transform with the light, creating an ever-changing canvas that draws photographers from all around the world. From dawn’s first light to the starry nights, Uluru exudes a timeless beauty.
The Red Centre, with its sweeping landscapes and remarkable formations, presents diverse photography opportunities beyond Uluru. The rich textures and unique wildlife of the outback create a dynamic backdrop for any photography experience. Uluru is not just a scenic landmark—it is a place of deep cultural significance, where the land itself tells the stories of the Anangu and their Tjukurpa (ancestral stories).
Nearby, Kata Tjuta and Kings Canyon offer distinct landscapes to explore, each with unique geological features and walking trails. Visiting these sites provides insight into the natural history and cultural significance of the Red Centre. Photographers and nature enthusiasts alike can capture the region’s diverse scenery while learning about Anangu connections to the land.
Best Times to Photograph Uluru
Sunrise at Uluru: Capturing the Day’s First Light
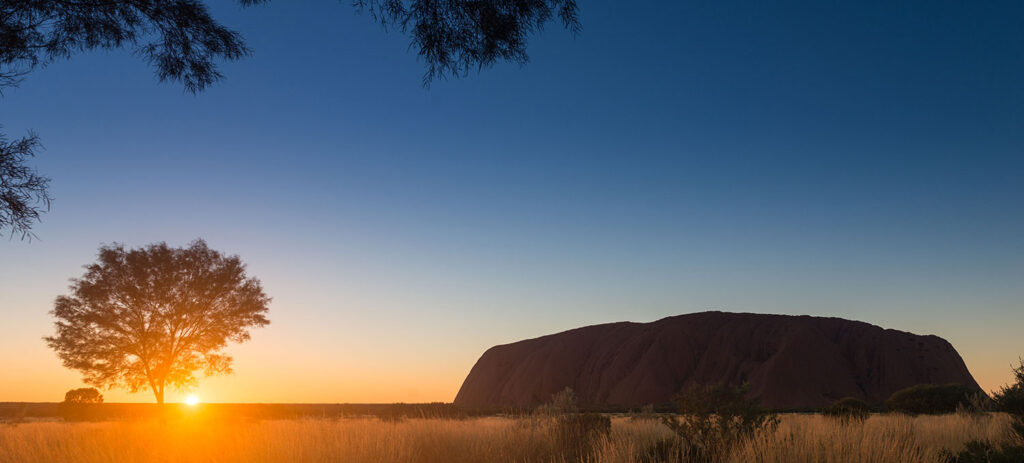
Photographing Uluru at sunrise rewards early risers with a peaceful atmosphere and stunning natural light. Just before the sun rises, soft golden tones begin to warm the rock’s surface, gradually revealing its deep reds and rugged textures. This is one of the most tranquil and visually rich times to shoot, especially from designated sunrise viewing areas where you can frame the silhouette against the glowing horizon.
Midday Photography: Embracing Harsh Light and Bold Contrasts
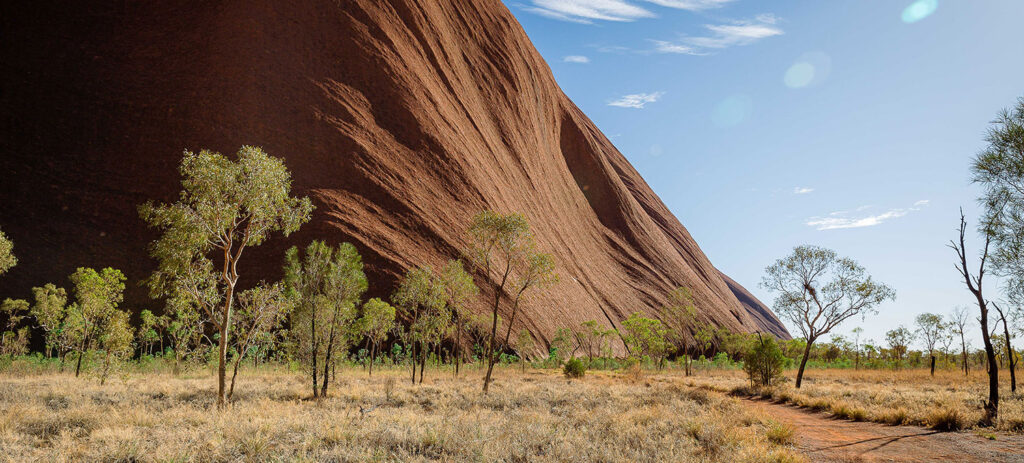
While midday sun is often considered challenging for photography, it offers its own unique character. The intense light brings out stark contrasts and bold shadows, highlighting the surface grooves and formations of Uluru. Vivid blue skies during this time also provide a striking visual contrast to the monolith’s warm, earthy tones. With thoughtful composition and exposure control, midday shots can be just as powerful as those captured during golden hour.
Photographing the Sunset at Uluru
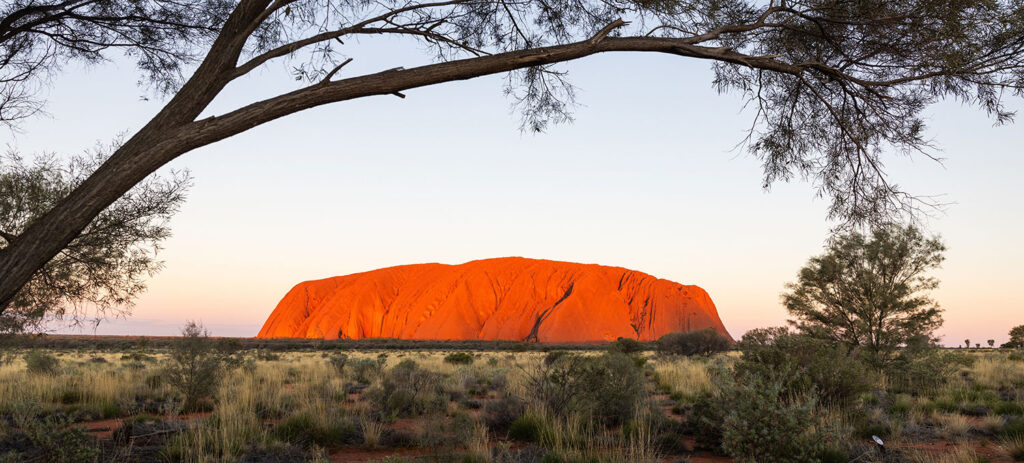
Uluru sunset photography is well-known for good reason. As the sun begins to set, the rock undergoes a remarkable transformation, shifting through a palette of deep reds, oranges, and purples. The interplay of colour and shadow creates a dramatic visual experience that is a favourite among photographers. This is also one of the busiest times at popular lookout points, so arriving early can help secure a quiet spot for the perfect shot.
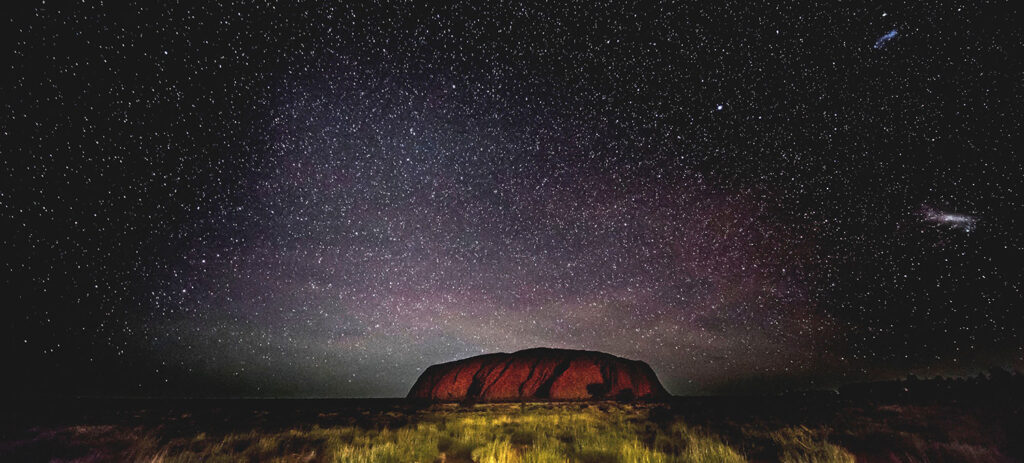
Night Photography: Stargazing and Celestial Beauty
Once darkness falls, Uluru becomes the backdrop for an incredible night sky. The Red Centre’s remote location and lack of light pollution make it ideal for astrophotography. With a long exposure, photographers can capture the Milky Way, star trails, and constellations with breathtaking clarity. Night sky photography near Uluru offers a peaceful experience, concluding your visual journey with a connection to the cosmos.
Planning Your Photography for the Best Results
The best photos of Uluru aren’t just about timing. They’re also about preparation and perspective. Visiting during shoulder seasons (autumn and spring) offers pleasant temperatures and more manageable crowds. For those seeking more solitude, consider exploring lesser-known viewpoints or joining small-group tours that provide access to quieter areas. Whether at dawn, dusk, or beneath the stars, photographing Uluru is a profound way to connect with the heart of Australia.
Technical Photography Tips for Uluru
Mastering Camera Settings for Uluru Photography
Photographing Uluru requires more than a good eye. It demands thoughtful control over your camera settings to adapt to changing light and vast landscapes. During sunrise and sunset, use a wider aperture (e.g., f/2.8–f/5.6) to capture soft, ambient light. Set your ISO low (100–400) to reduce noise and retain colour depth in warm tones. A tripod will help stabilise longer exposures and ensure crisp, clear images during low light.
For Uluru night photography, increase your ISO to 1600 or higher, open your aperture wide, and set a long exposure time (15–30 seconds) to fully capture the brilliance of the Milky Way and surrounding stars. Always shoot in RAW format to maximise editing flexibility during post-processing.
Choosing the Best Lens for Photographing Uluru
Lens choice plays a vital role when capturing both the scale and details of Uluru. A wide-angle lens (16–35mm) is ideal for showing the entire monolith and surrounding desert in one breathtaking frame. For more detailed shots, such as rock textures, patterns, and crevices, a telephoto or zoom lens (70–200mm) allows for tighter compositions that reveal the intricate features of the rock’s surface.
Combining both types of lenses gives you the flexibility to photograph Uluru landscapes and close-up details from various vantage points throughout the day.
Enhancing Light, Shadow, and Colour in Your Images
Uluru’s landscape changes dramatically depending on the time of day and season. During midday, embrace the high contrast and strong shadows to emphasise texture and form, ideal for monochrome or high-dynamic-range (HDR) shots. In the golden hours of morning and evening, focus on capturing the vibrant reds and oranges using subtle shadow play and careful white balance adjustments.
Understanding how Uluru interacts with light lets you highlight its natural curves, crevices, and rock layers, adding depth and drama to your compositions.
Composing the Perfect Uluru Shot
A compelling Uluru photo requires more than sharpness and clarity. It thrives on composition. Use leading lines from surrounding dunes or trees to draw the viewer’s eye toward the rock. Incorporate foreground elements, like desert shrubs or reflective surfaces, to create depth and dimension.
Following the rule of thirds can balance your image, especially when framing Uluru with the sky, horizon, or surrounding terrain. Don’t be afraid to change perspectives. Sometimes, shooting from a lower angle or a more distant viewpoint captures the grandeur and solitude of the Outback more effectively.
Additional Uluru Photography Tips
- Use a polarising filter during daytime shoots to reduce glare and deepen sky contrast
- Always check weather conditions and sun position in advance for optimal light
- Respect all cultural guidelines and photography restrictions, especially near sacred sites
- Experiment with time-lapse photography at sunrise or star trails at night for creative variations
Sustainability and Responsible Photography
Uluru is an amazing landmark to photograph, but responsible and sustainable practices are essential. Photographers must approach the site with respect for the environment and cultural significance.
To minimise ecological impact, stick to designated paths and viewing areas, and follow all signage and local guidelines. Photography at Uluru is not just about capturing the perfect image—it’s about protecting the land and respecting its cultural and spiritual importance.
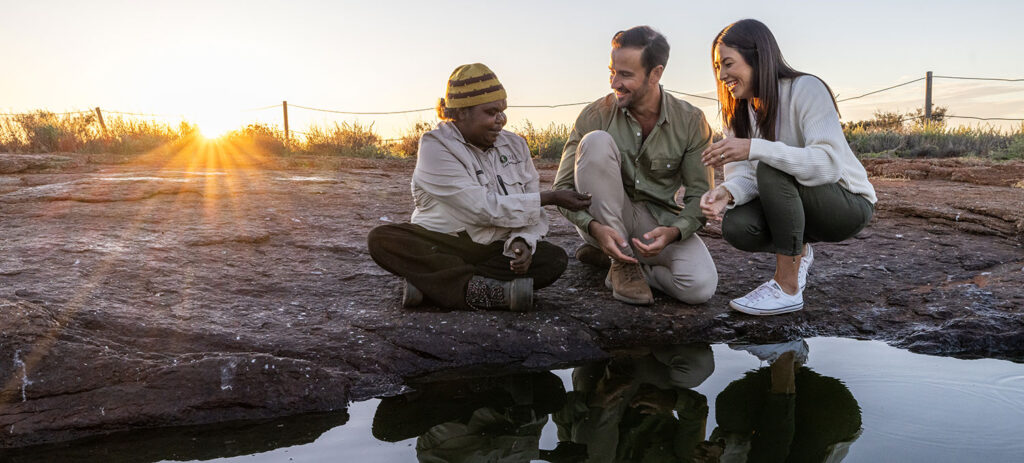
For a deeper connection and understanding, joining a SEIT tour allows visitors to learn directly from local Aboriginal guides. These small-group, culturally respectful experiences provide insight into the regions’ culture and history, helping photographers capture images that are meaningful, informed, and sensitive.